Friday 13 December 2013

Christmas cards to share

I thought I'd share with you some Christmas cards I've been making lately.
The stamp sets I have used for these cards include:
 
* Open Sleigh
* Christmas Messages
* O Holy Night
* Merry & Type
* Special Season
 
I Hope you're enjoying your Christmas crafting as much as me! I Love this time of year!
 

Thursday 12 December 2013

advent calendar

I thought I'd share with you a project I made last advent.  I was inspired by some projects that were showing up on pinterest and wanted to create something with products I had on hand. 
 
Using the Stampin' Up! Pillow box die I cut some boxes using some scrap pieces card. Next I used the alphabet die to cut numbers out.  I then die cut some Christmas ornaments using the Stampin' Up holiday ornaments bigshot die.
 
Using the cropadile I punched a small hole in the top of each one and secured a gold eyelet in place.  I then threaded a small piece of gold string through the hole and tied a knot to form a loop.  I collected embellishments together I had on hand that matched my silver and gold theme.
 
I used a pin up board I had at home to display them on and simply attached them with a pin through the loop of string. This means I can easily take them off the board at the end of Christmas and store them in a box to prevent them getting damaged in storage.
 
Each year I fill them with chocolates and when the kids get older I'd like to add some Bible verses and write down on pieces of paper to slip inside each box some fun Christmas activities we can do as a family.
 

Friday 6 December 2013

Framelit dies from stampin up

Thankyou to Tenealle Williams for this fabulous way of using the circle framelit die from Stampin' Up! I used this card for my class last night and it is alot more complicated than it looks! I've increased the length of the framelit card by allowing the end to go over the top of the framelit rather than underneath.  The total length of my card is 10 3/4 inches by 5.5 inches wide.  I absolutely love the end result though and it was definitely a hit with the class.  It's a great one to give away to a very special person as it is personalised with a photo, making it extra special.
 

Christmas cards

I thought I'd share with you some Christmas classes I am running at the moment.  I'm really loving the winter Frost dsp and am pairing it alot with the baked Brown Sugar card stock and burlap ribbon.  My classes are every Monday night at 7.30pm in Berri
 

Tuesday 3 December 2013

Projects made with white mist spray

Following on from my last post about creating your own white mist spray I thought I'd share with you some recent projects both scrapbooking and card making related that I have used this technique on. When using your white mist spray, generally wait until you have completed your project hold it about a metre away for a very fine dust or closer for a spattered result.

To find out how to make your own spray click here


Saturday 30 November 2013

How to create white mist with Stampin' Up! products

Firstly you will need a stampin up stampin spritzer and you can get a pack of 2 for $4.95 (126185). Next you'll need some whisper white craft stampin ink refill (101780). From the supermarket or pharmacy you'll need to purchase some isocol ( rubbing alcohol antiseptic).

Place a small amount of white ink refill into the spritzer enough to fill about 1-2 cm. Then fill the remainder of the spritzer with the rubbing alcohol shake and then spray.  If the white isn't showing up enough just add some more refill until you're happy with the result.  I'd you add too much the nozzle will become clogged and it won't spray properly.  I've been using this product alot lately on both my cards and scrapbook layouts. This technique can of course be used with any colour re-inker and rubbing alcohol in a spritzer. So why not have a go experimenting with some different colours on your next card or scrapbook layout!
 
Click on the link below to have a look at some different projects I have made featuring this technique:
Christmas Tags
- Card and Scrapbook layouts


How to create a vellum envelope with Christmas tags

The new Stampin' Up!  Punch Board makes it so easy to create envelopes of any shape or size.  I absolutely love the look of vellum envelopes creating a soft look that you can see through to the card or tags you've created.  Add some ribbon, string or a mini clothes peg and and creation is complete. 
For this simple project I created my vellum envelope using a piece of vellum that was 8 1/4 inches x 8 1/4 inches.   I then followed the simple instructions of the punch board to create an envelope to fit a card size of 4x6 inches. I glued the envelope together using my snail adhesive and lined the envelope with a pice of dsp from the season of style measuring 4x6 inches.

To make the tags I used an A4 piece of crumb card card stock and cut 10 tags out of it measuring 2 inches x 3 3/4 inches.  I created a tag look but cutting the corners off the top of one end of the tag. I then punched a 1/2 inch circle out of some baked Brown Sugar card stock and stuck that on the top of the same end I cut the corners from and then punched a hole in the middle of the circle  using my 3/8 inch circle punch. 

Next I stamped my sentiments using the Christmas messages stamp set in versamark and embossed them with white embossing powder.  I then stamped an image over the top of the writing in versamark from the open sleigh stamp set. I then sponged the edges of the card with white craft ink. Then sprayed each card with white mist (made with a combination of white craft ink refill and isocol (rubbing alcohol) in my stampin spritzers. To find out more about creating your own spritzer click here

Lastly I tied a piece of vanilla string on top of the card, placed 9 inside the envelope and attached one to the outside with a mini clothes peg.
 

Sunday 17 November 2013

oldies but goodies


I probably made my first version of these cards about 3 years ago. Over the years they have adapted a changed a little but they remain classic and vintage looking which is exactly what I love!
 
products used include: stamps: simply soft, dictionary, en francis
card stock: whisper white, basic grey, blushing bride, crumb cake
ink: staz on black ink, crumb cake, baja breeze, blushing bride, pear pizzaz
accessories: pear pizzaz and baja breeze seam binding ribbon
 

Friday 15 November 2013

Invitations

I've just finished some invitations for a special friends 30th. I'm really happy with how they turned out!

Below is a picture of a simular project but in a card form for another special friends baby shower.  I love this stamp set!

craft market

Last night I had a stall at a local craft market.  I had alot of fun selling my handcrafted goodies!

Monday 11 November 2013

November make at home class

Cost $15 including postage. You will receive all the materials you need to make these 3 cards. The only thing you need is double sided tape. Enrolment for this class ends 18/11/13. Payment is by bank transfer or cash on pickup. Please contact me if you'd like my bank details. Please also message me your address so I can post your kit to you.
 
 
or contact me via email at carlilouiseambrose@gmail.com
 
This class kit contains no Stampin' Up! stamped image as per their Angel Policy


Saturday 26 October 2013

christmas is coming


I thought I'd share some cards I'll be making in my upcoming classes in November. What's your favourite?

Tuesday 22 October 2013

new thinlit card dies

 
Click on the image to find out more info
 
Checkout this new Bigshot die. Make 100's of different types of cards with this set. It's available for a limited time only. Don't have a Bigshot to use them with? Why not book an online party? Sales reaching $400 qualify for an extra $25 (totalling $85 free product) til the end of October. Contact me at carlilouiseambrose@gmail.com for more details

25% off 25 stamp sets!

 
click on the image above for more info on this special offer and remember you only have until the 28th October!
 

Wednesday 2 October 2013

Join for $25


YES YOU READ RIGHT!!!  This is one amazing offer and I haven't seen anything like it in my 4 years as a demonstrator!

There is a little fine print however.

Offer: New recruits can join Stampin’ Up! for just $25 !
Dates: 7-21 October 2013

The Fine Print:
  • This offer is only good for two weeks, (7th – 21st October) so take advantage of it right away!
  • During this offer, only the special $25 starter kit will be available; the regular $169 starter kit will not be available. The $25 Starter Kit includes
    • $26.95 worth of Stampin’ Up! product (it must be more than $25, but not more than $26.95)
    • Business pack which includes
      • A box of annual catalogues
      • A package of the current seasonal catalogue
      • Getting Started DVD
      • Starter Kit Business Brick
      • Customer postcards
       
This is perfect for you if you have a mountain of Stampin’ Up! product already, or if you were a Demonstrator in the past and would like to rejoin.

Some extra bonus about becoming a demonstrator:

• You'll get an extra 10 percent discount on your first order of $300 or more when she places her order in the first 45 days of being a demonstrator. That means she can use the money she saved on the $25 starter kit to get 30 percent off her first order of Stampin' Up! goodies!
• You will also get two FREE months of Demonstrator Business Web Services (DBWS) if you subscibe within 21 days of joining!

Check out my join Stampin' Up! page to find out more. If you have any questions don't hesitate to contact me. Be quick though, this special offer is only available for 2 weeks!

There's really not much to loose. What are you waiting for?!

Tuesday 24 September 2013

Bigz Gift Bow


Check out the new bigshot Gift Bow die. How awesome is it? It is extremely versatile and can be used for so many different types of cards. Here I have used it for a Father's Day card I made for my dad. It can be purchased from my shop:


Friday 20 September 2013

hello lovely

 
I have discovered a new technique that I'm using a lot on my cards lately and it is so simple! All you need is an embossing folder and a white ink pad. You simply rub the white ink pad on the embossing folder and then run it through the big shot. It works particularly will with the wood grain embossing folder like I've used on this card. Have I mentioned I love the new in colour trim ribbon?!? Isn't it gorgeous! On this card I've just wrapped it around a rectangle piece of card and I've used the Hello, Lovely stamp set (130243). To finish it off I've dyed a small clay flower with the coastal cabana re-inker. Very simple but quite effective!

Thursday 19 September 2013

elegent butterfly

 
I love the new silver and gold (132622) foil sheets Stampin Up have bought out. They really lift a card and make it look extra special. Here I have simply punched out a circle using my 6.4cm circle punch (120906) and layered a rectangle piece of embossed vellum behind it. I then punched out a butterfly (127526) embossed it and then sewed it on top of the gold circle. I've used a large rhinestone basic jewel in the centre of the butterfly (129324) and used some smaller rhinestones on the gold circle. To achieve the white powder background it's a new trick I've learnt and you simply rub your white inkpad (101731) on an embossing folder before running it through the bigshot. I hope I've given you some inspiration with this card!

fine feathers

 
I love how this card turned out. I played around with painting in crushed curry, coastal cabana and strawberry slush with aqua painters onto watercolour paper. I then stamped 3 of the fine feathers stamps. I embossed and die cut the bottom of the card with the delicate designs embossing folder and coordinating large scallop edgelits. I absolutely love these colours together!

Wednesday 18 September 2013

Always & Forever

 
I loved how this wedding card turned out! The colours work so well together and really complement each other. I think Gorgeous Grunge has officially become my new favourite stamp set. It seems to find it's way into most cards I've been stamping lately. I have once again used my sewing machine on this card. I just love the delicate detail it adds.
 
Stamps: This Day Forward: 130387 $28.95, Gorgeous Grunge: 130517 $33.95
 
Accessories: Baked Brown Sugar card stock:131301 ink: 131174 $9.95 pistachio pudding ink: 131177 $9.95, pistachio pudding ruffle stretch trim:130020, linen thread: 104199 $7.95, Venetian Romance DSP: 130144 $18.95, whisper white card stock: 106549 $14.95, Rhinestone Basic Jewels:119246 $8.95
 
Find all of these supplies in my online shop 24/7


Sunday 25 August 2013

Beautifully Baroque


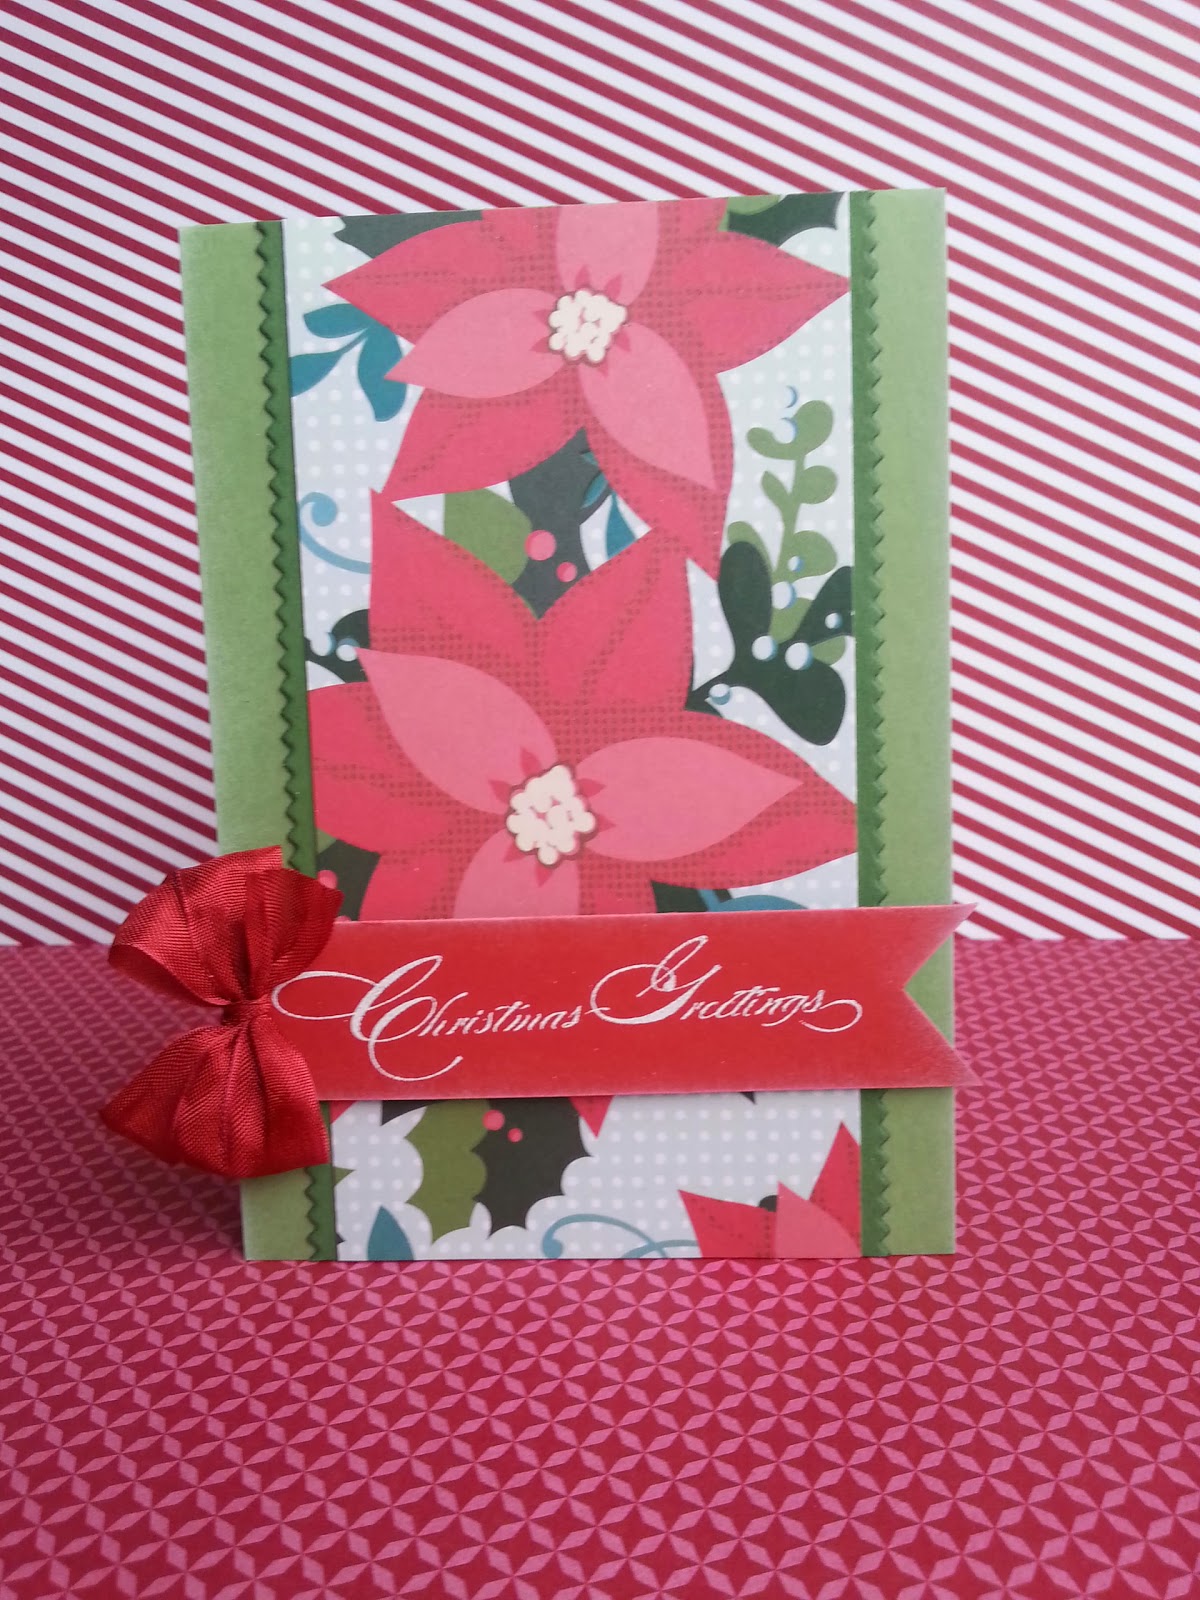
This card is so quick and simple to make but so effective. Check out what I’ve used to make this card below:
Stamp sets: Dictionary: 130348 $30.95, Beautifully baroque: 130895 $25.95, A dozen thoughts: 131056 $36.95, gorgeous grunge: 130517 $33.95
Accessories: baked brown sugar cardstock: 131301 $11.95, StazOn black ink: 101406 $13.95, coastal cabana cardstock: 131302, coastal cabana ruffle stretch ribbon 130024 $15.95 Eastern Elegance DSP: 130131 $18.95, Versa mark ink: 102283 $12.95, White stampin Emboss powder: 109132 $8.50, Simply pressed clay 130685 $11.95 buttons and blossoms simply pressed clay moulds: 131272 $13.95, sponge daubers: 102892 $18.95, baked brown sugar ink pad: 131174 $9.95
Find all the supplies in my online shop 24/7


Thursday 15 August 2013

you make me happy!


I love the new stamp set Regarding dahlias. It is such a versatile stamp set and quite affordable at only $27.95. The base of this card is the new in colour coastal cabana and I have embossed that using the modern mosaic embossing folder. I have stamped a piece of crisp cantaloupe with the dictionary stamp (also a new fav) using crisp cantaloupe ink. I have layered a piece of vellum over the cardstock and made it bigger than the crisp cantaloupe so it hangs over the edges slightly. I've stamped the flower in crisp cantaloupe on a square piece of whisper white cardstock and have stuck that on top of some crisp cantaloupe cardstock. I've embossed the "you make me happy" stamp from the Hello, Lovely stamp set in white embossing powder on coastal cabana cardstock. I've tied a piece of pool party twine around the stamped flower twice and finished the card off with a big vintage faceted button

Stamp sets: Regarding dahlias: 130327 $27.95, Hello Lovely: 130243 $45.95, Dictionary: 130351 $24.95

Accessories: Modern Mosaic embossing folder: 129984 $13.95, coastal cabana cardstock 131302 $11.95, crisp cantaloupe card stock: 131303 $11.95, whisper white cardstock: 106549 $11.95, crisp cantaloupe ink pad 131175 $9.95, vellum 106584 $10.95, Vintage Faceted designer buttons 127555 $9.95

Buy all of these supplies in my online store 24/7

Monday 12 August 2013

Too Kind


I love the new in colours in the catalogue and this card features 3 of them: strawberry slush, crisp cantaloupe and pistachio pudding. For this card I have two step stamped the too kind flower on top of each other. The bottom flower is in crisp cantaloupe and the top in strawberry slush. I've used pistachio pudding for the stem. I have put a rectangle piece of cardstock behind the whisper white just pop it out a little and have stamped the "You're in my thoughts with strawberry slush and cut a little flag out of the left hand side. Underneath I have sewn a piece of the crisp cantaloupe stitched satin ribbon with my sewing machine (I love the look of a sewing on a card...it just gives it that extra detail. I have put a piece of pistachio pudding DSP on top of the strawberry slush cardstock which I have embossed with the modern mosaic embossing folder. Lastly I have used the simply pressed clay which I ABSOLUTELY LOVE!!! I have dyed it with strawberry slush ink and used the flower mould. I love how you can dye the clay any colour to match your cards and how economical it is for an embellishment. I've just used my first packet of clay and I think I would've made more than 200 embellishments from it!!!
Stamps: Too Kind 130450 $33.95, A dozen thoughts 131059 $36.95
Accessories: Pistachio pudding cardstock 131299 $11.95, strawberry slush cardstock 131300 $11.95, whisper white cardstock 106549 $14.95, pistachio pudding ink pad 131299 $9.95 strawberry slush ink pad 131178 $9.95, crisp cantaloupe ribbon 130021 $15.95, simply pressed clay 130085 $11.95, buttons and blossoms moulds 131272 $13.95, 2013-2015 DSP 130136 $37.95

Buy all of these supplies in my store 24/7


Tuesday 6 August 2013

Buy 3 get 1 free!!!

Shop in my online shop 24/7 to take advantage of this special offer today! Remember offer ends august 31st


Wednesday 31 July 2013

Need an Invitation?


Do you need an invitation for an upcoming wedding or party? Don't have the materials or time to make them? These handmade invitations are just $4.50 each. Enquire today!


This site was made with ♥ by Angie Makes